Sunday, December 4, 2022

Rebuilding a Hutchins Oogah Horn

Many years ago one of the various vehicles I bought and sold had an oogah horn on it. I put it on my truck, and each time I horse-traded trucks it was lovingly removed and relocated. At some point, I ended up letting the horn go with the truck. It didn't take long to regret my move.

I never disconnected the original factory horn when I installed the oogah horn--I always added another horn circuit. To me it wasn't a replacement to a factory horn, but an addition. It was my party horn. It was the horn I used when I was among friends or family. It was the horn of choice when I wanted to scare somebody walking in front of my truck. I missed it.

A few years ago I started looking a few years ago for a replacement, and it had to be a genuine Hutchins brand. There are still some out there, but it's hard to find one (12-volt especially) that works for under $100, and if you do it's going to be ugly. I finally found one on eBay and plunked down $45 for it, and yes--it was ugly. It didn't work but was basically intact. I knew I could get it working. I didn't save a good picture from the eBay ad, but I do have this small, ugly one. You can see it was in tough shape when I bought it. The painted portion was rusty, the chrome portion was bent and covered with flat black spray paint, the wiring grommet was gone, and it had quite a bit of rust inside. (After all, they're out in the nasty rain and stuff under the hood.)

I dissected it and tweaked a couple things for a bench tryout. It spun, but not too well, and no noise at all came from it. But, as I said, it spun so I was happy with my purchase. After I tried it out, I left it in pieces and put it in a box for safekeeping, basically forgetting about it. A year or two later when I bought my GMC I had a renewed interest in it. Let's make that baby work!

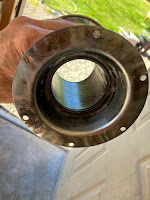
I tore it down and spent quite a bit of time straightening it and cleaning the paint off the chrome end of the horn with various chemicals until it shone again. To treat all the rust I used this stuff I got at Lowe's for about $15. Like most similar products, you just paint it on and it converts the dry, rusty area into a hard, shiny, black surface that's a perfect base. Here you can see what it looks like after I painted the stuff onto the rust inside the horn bell and let it dry.


When I tore it apart, almost all the screws holding it together twisted off when I tried to unscrew them, and the paper gaskets on either side of the drum head were almost totally disintegrated. Well, there are no Hutchins oogah horn paper gaskets anywhere on planet Earth that I know of, so obviously I had to make them. No problem--we have a Cricut here at our place, and it makes awesome gaskets!

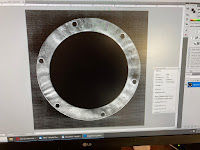
First, I placed the horn bell on the scanner and took a picture of it, then I cleaned up the resulting scanned image in Photoshop, making sure all the edges and holes were smooth. Note: If you don't smooth the edges, the poor Cricut will work itself to death trying to cut what it thinks are intricate cuts but are really just rough edges. No dimensions were changed during scanning or editing, so the screw pattern should be accurate.


I spent some time cleaning and prepping on the painted parts, then shot them with some good ol' Krylon dark blue like the original was. The brushes were in good shape (after all, a horn isn't a continuous-running thing), so I didn't have to do anything there. I bought stainless steel screws to replace the old rusty originals. I reassembled it as careful as I felt like being, carefully lining everything up before tightening the screw that holds cap on the motor. (The new gaskets fit flawlessly!)


Now that I finally had my fully-functional Hutchins Oogah horn, I had to figure out how to mount it. The OEM setup was a simple, almost flimsy L-bracket that utilized two of the screws. I wanted something that didn't allow the horn to vibrate all the time like the originals do. You probably know the bracket I'm talking about. It's in the parts list at the bottom of the post if you don't. I opted to build a 'two-level' mount, with part of the mount carrying the weight of the motor, and the other end providing support for the bell end to keep it from vibrating. I used a couple of sections of 3" exhaust pipe I had laying around, adjusting the radius to match the horn dimensions. I tied them together with a piece of 1/8" x 1" steel strap material. I opted to mount it on driver's side, next to the radiator. It seems like a good, out-of-danger place to put it--I may be wrong. Time will tell.

After mounting it all up, it all fits perfectly, but I'm not totally pleased with the hose clamp look as I thought I would be.


When it came time to tune it, I was at a loss. I couldn't see a way to tune it without building a special little tool to make it happen. (I'm sure they had something similar in the factory.) Basically, all I did was cut a 6" length of tubing from some scrap I had laying around, then welded an old 7/16" 1/4" drive socket to one end, and spot-welded a 1/4-20 nut on the other end. The length I chose was long enough to reach the depth of the horn adjustment nut. This 3/16" blade Crapsman screwdriver (part# 41248 K WF) is just the right size and length to reach all the way through the tool. Now it's just a simple act of adjust/tighten/lock/test/loosen/adjust/lock/test until you get the good oogah tone.


For those of you looking for a tech info about the Hutchins Oogah horn, here's a parts list:


Friday, November 25, 2022

Rear Brakes (or lack thereof)

The next day I went outside somewhat excited to start tweaking things, kicking tires, and truly looking at what I had bought. I knew I had lots of work to do on the truck overall, so to get it as close to tools and stuff I opted to pull the motorhome out and park the GMC sideways behind it, in front of the shop door. I squeezed the motorhome back in so they were both behind the gate. Putting the truck there was the obvious choice anyway because having no idea idea how long it would be laid up for, it would keep it from blocking any other vehicles.


When I start to work on vehicles I buy, I almost always start with the brakes, and this truck was no exception. After all. stopping is much more important than starting! As I mentioned previously, the brake warning light lit up like a Christmas tree while we were on the road headed home after buying it, so inspection was definitely required.
 
During my half-assed initial inspection I saw the true cause of the brake warning light, and it wasn't the emergency brake. There was brake fluid all over the left rear backing plate and tire. I popped the top off the master cylinder and the rear half of the system was dry. It had flown the coop through the left rear wheel cylinder. There was brake fluid 'spin art' everywhere. The brake shoes were in real good shape wear-wise, but there was no way they were going to remain--cleaned well or not. Because of the C6P Heavy Duty Chassis package, the truck is equipped with, among other things, 13" x 2 1/2" brakes! I like that. The stamped code on the differential housing is BJB, and according to my manuals, translates to 4:10 gears. Figures. I was hoping for 3:73.

After checking what all I needed, I went inside and ordered rear brake shoes, wheel cylinders, and a master cylinder from Rock Auto. I opted for 'fleet quality' Centric riveted shoes--top of the line--so they would wear well, stop well, and do both quietly. The drums were great and showed very little wear, luckily.

When the brake parts came I was excited to get them installed and finished up. The install went well, with no rust issues or anything. When I put it back together, I couldn't get anything more than a trickle out of the left rear bleeder. I tried to access the proportioning valve to reset it, but it was mounted down low, on the engine crossmember. I took the radiator out, and the fan off, making plenty of room. Try as I might, I couldn't get the proportioning valve piston to move freely back and forth. I got it released once, but as soon as we tried to bleed the brakes it stuck to one side again, shutting off the rear brakes. Sigh. Oh well, it's not like I didn't have anything else to do, haha. I did some research and found a good proportioning valve and ordered one up. I think it was about $50. At the same time, I also ordered a new brake line for the left rear--mainly because I wanted a new fitting on the brake drum end.

Another item in the braking system had me a little concerned. It's a 'load-sensing' valve that's mechanically attached to the frame and rear end. What it does is, it restricts full braking to the rear brakes if the truck is riding at normal height. When you put a load in it, the truck 'squatting down' would allow full brakes to the rear wheels as well as the front. It was designed to keep empty trucks from having their rear brakes lock up unexpectedly. It turns out that GM sent out a bulletin some time later, instructing dealers to bypass the valve and remove the linkage. It was GM bulletin 88-T-151 (shown on the reference materials line at the very top of the blog page). Here's what the whole setup looks like in the GM parts catalog:


Most of it was removable without cutting, but there are still couple residual brackets remaining that I'll remove more cleanly sometime in the future, along with cleaning up the altered brake line routing.

When all the new brake goodies showed up I got them all installed without a hiccup. I love working with new parts! Brenda hopped in and lent her brake-bleeding leg once again, this time with instant results. That's what I like.

After driving the truck I noticed no sign of early lockup or anything else. Nice braking!

During the two weeks or so that I had the truck up in the proctologist's saddle I was able to work on a lot more items that needed attention, and there was no shortage of those!


Thursday, June 2, 2022

Bed Liner Be Gone

I have a love/hate relationship with bed liners. I love how durable they are, but dislike the static electricity danger and potential for hiding rust. They are also very unwieldy to remove and reinstall each time if you 'part-time it' and you feel a load of gravel coming on. I put the front wheels on stands and pressure-washed the liner before I took it out:


When I removed the liner I was afraid to look at what I might find, even though it looked okay from below the truck. I breathed a sign of relief and grinned when I saw what was underneath: A near-perfect bed! It had some wear marks from years of rubbing or vibration, but overall very nice. Again with the pressure washer and I was happy.


I put the bed liner and its tailgate liner on Craigy's List for free and they were gone in a couple hours. The guy that showed up to pick them up was driving a diesel 6+6 crew cab. It was pretty ratty, having a bent-looking canopy that covered a bed full of 'who knows what kind of shit' and no rear bumper at all. When he emptied his cargo and started to put the liner in, he (we) realized that the top of the bed liner went over the truck bed, interfering with the canopy. At that point I wandered away and let him trim or whatever he needed to do. He got it all finished and I helped him put his canopy back on (he had dragged it off there himself!). We chatted a bit, looking my new truck over. I told him that fugly rear bumper was going to be coming off of there soon. "Text me when it does," he said, motioning to his truck, "as you can see I need one."

Wednesday, May 25, 2022

Road Trip Retrieval

I shopped around a long time for my most recent truck before finding it. Lots of time went by as I kept an eye on Craigslist, Offerup, and FB Marketplace. I spent plenty of time perusing ads (wasting time).

I had reached a position with the old 84 Chevy that I was just no longer interested in the truck. Well, unless I was driving it--that was always fine. I wanted to upgrade my truck in several areas but it was not the base I wanted to build on. I felt I'd be just giving my money to the next owner. I wanted to start with the right truck.

When I found what I considered to be what I was looking for, it was on Facebook Marketplace (I only have a FB account for their marketplace.) I wasn't thrilled because it was so far away, but that's just the way FB anything works... you tell them what you want to see and they give you what they want you to see anyway. Thanks to retirement, I didn't have to do much planning to go down to look at the truck. I chose a day and away we went. (Looking back, we should have gotten a much earlier start.) By the time we got to the guy's place near Grants Pass, Oregon, it was after 5pm.

Here are a few pictures from the ad. (I thought I had saved them all, but I lost several.)


The truck looked a little better in person than it did on the ad, which was a good start. It seemed to run fairly good, and everything I looked over was looking okay as well. We took it for a drive, and when he stepped on it, both the engine stumbled and the transmission slipped briefly at the same time. He only acknowledged the the engine, citing the engine as 'not being warmed up'.

I wasn't too worried about that. I was mainly worried about whether or not it was going to get me home!

Like a fool, I really didn't check too many things before taking off for home like I should have. Maybe it was the weed we smoked to ease nerves or whatever. Luckily, nothing went wrong, but several things could have (more on that later). It was very evident right away that the tires were too short in stature when I got on the freeway. The rpm's were a bit higher than I was used to. I remember asking the guy what the rear end ratio was. "Low," he said. When I got on the freeway it was almost as if there was no high gear and it was stuck in 2nd! You can see by the picture here how much shorter these tires were. The tall one on the right is the correct, stock size, and even fairly worn down was a lot taller than what was on the truck.

I didn't check the water level before we left, and it was dangerously low when we finally got home (yes, we got home without incident) at about 10 or 11pm. When we left the guy's house I gassed up before getting on the freeway. It has two gas tanks, but the right tank hadn't been used in a while, and I didn't feel like causing a major fuel line blockage if I suddenly opened up a dam of shit of some kind. I filled the tank, and by the time we crossed the Columbia into Washington again I was on fumes. Obviously, I was driving too fast, trying to keep up with traffic with normal gearing. For the final leg of the trip I kept the speed around 55 or so and had almost a half a tank left when we pulled into the driveway! Huge difference. Another thing that happened: Not long after we first got on the freeway with it the brake warning light came on. I didn't think much of it--I just figured it was the parking brake lever switch. The headlights were a little on the dim side, but they were working and the alternator was charging, so that part was fine. Lots of noises, rattles, squeaks, and unknowns. I had 2 dash lights, and none of the gauges were working except the temperature, and I didn't much trust that either. Luckily, it never rained on the way home, because although the wipers did work, I had no idea if the rubber on them would be up to the task.

I went out to check out the next day to see what I had bought (laughs nervously). The brake proportioning valve had apparently saved my ass. The left rear brake drum had a puddle of brake fluid under it and saturating everything, and the rear brake reservoir was bone dry. Without the two-part master cylinder that all vehicles currently use I would have been without brakes. Note to self: Never assume it's just the parking brake switch. I also noticed the radiator was dangerously low--like below half. Yow! I could have wasted the newly-rebuilt engine out of stupidity!

I have a rule: I never do anything major to a vehicle I buy until it's in my name, so that was the first order of business. I hurried right down and got the title transferred and got my new plates.

Ownership. Let the adventure begin.


Friday, May 20, 2022

A Simpler Squarebody

After selling the GMC, I was without a truck. It didn't bother me too much until the time when we went to pick up a radial arm saw in my girlfriend's Toyota Camry. Station wagon or not, a Camry wagon is not a transport vehicle. The saw had to be disassembled to fit inside it of course.

So, I again went out on the hunt.

This time I was searching for something in the same year range, but with little to no frills. I still had a bad taste in my mouth from the 86 GMC even though the 'frills' it had didn't give me any problems. I just wanted a good, simple truck that was old enough to not need to go through an emission inspections.

What I found was the ad on the right:

I was looking for simple, and that's what it was--a "plain Jane" pickup. It ran okay, stopped okay, and drove okay, but there was no way it was going to pass an emissions test with the wrong engine and NO pollution controls left on it. I offered him $1100, explaining my reason. The couple said no to that offer right away and I left. They called me two days later, accepting my offer.  They had to sleep on it a day or two, but I guess nobody else called--possibly for the same reason.

 Anyway, here's a couple of shots of the truck they sent me before I bought it. I think it was a pretty fair deal considering the condition it was in.


The truck was pretty spartan, especially when I compared it to the GMC I came from. This one had no carpet, no A/C, no intermittent wipers, no nothing--manual everything except steering and shifting. I was pleased though. I had myself a truck again! 

I had the usual things to fix that I find in almost everything I buy. There are always wiring issues, and this was no exception. When I stepped on the brake the right front turn signal came on, along with the dash turn indicator (although dim). Turns out the socket in the front parking light was broken and the hot wire was grounding out. It had vacuum leaks, bad modulator, and all kinds of small things.

It was a good truck, and it was pretty quiet inside, and rode like a car, but after several years of ownership I had grown distant from it. I wanted a truck to upgrade, but this was not the one. I wanted something better to build on before I started pumping money into it.

Here's what it looked like when I put it up for sale. It was clean, trustworthy, and didn't even have a single squeak or rattle:


Friday, May 13, 2022

The 86 K1500 4x4

My first Square
After putting the Ford behind me, I went out shopping for something with some more creature comforts. This is what I found and settled on: My first squarebody truck, an 86 GMC K1500 High Sierra. It came equipped with a 305, 700R4, power steering, power disc brakes, cruise control, delay wipers, AM-FM cassette, twin fuel tanks, and block heater. I don't understand why they didn't order it with power windows and door locks though--that was about all they missed.

I bought it from a small car lot for too much (I can't remember what I paid actually) money. The mileage wasn't reflected much in the body or interior because it was almost all highway miles. It didn't have a lot of the usual wear you see in high milers. Well, the usual visual wear that is. I decided that the bed was nice enough that I didn't want to see it go to hell, so I had a spray-in Rhino Liner applied to the bed. I really had a lot of fun in this truck. The 305 ran good, used no oil and made no noises, but it was a little tired and anemic after I had owned it for a couple years. The transmission was starting to slow, the rear was starting to whine... You know--all the mechanical stuff was starting to die a slow death. But that's not what really made me sell it.

Not long after I bought it, an electronic gremlin appeared. A mysterious, intermittent loss of spark that would leave me stranded occasionally. Bear in mind, this was also the last of the carbureted trucks before they all went EFI, so that year of Quadrajet carburetor was riddled with electronic sensors. Practically everything on the truck seemed to interact with each other, so it was hard to troubleshoot anyway. The starting system was never a problem. The starter always spun nicely. There was always plenty of gas also. What was missing? What else? The spark! I fiddle farted around with everything I could, but never found the culprit. When you'd come out of the store and nary a fart would it utter.  Sometimes there would be weeks between events, sometimes hours. Sometimes it would work after trying it a few times, but more than once it left me stranded until the next day. I'm pretty sure it was the ECM because it was about the only thing left to change, but I'd had it at that point. No more of that ECM crap for me. I started looking for another squarebody, but this time I wanted something more stripped down and easy to troubleshoot.

Funny--when the guy showed up with his trailer to pick it up, he hit the starter before we started pushing 'just to see' and it fired right up.

Of course.