Many years ago one of the various vehicles I bought and sold had an oogah horn on it. I put it on my truck, and each time I horse-traded trucks it was lovingly removed and relocated. At some point, I ended up letting the horn go with the truck. It didn't take long to regret my move.
I never disconnected the original factory horn when I installed the oogah horn--I always added another horn circuit. To me it wasn't a replacement to a factory horn, but an addition. It was my party horn. It was the horn I used when I was among friends or family. It was the horn of choice when I wanted to scare somebody walking in front of my truck. I missed it.
A few years ago I started looking a few years ago for a replacement, and it had to be a genuine Hutchins brand. There are still some out there, but it's hard to find one (12-volt especially) that works for under $100, and if you do it's going to be ugly. I finally found one on eBay and plunked down $45 for it, and yes--it was ugly. It didn't work but was basically intact. I knew I could get it working. I didn't save a good picture from the eBay ad, but I do have this small, ugly one. You can see it was in tough shape when I bought it. The painted portion was rusty, the chrome portion was bent and covered with flat black spray paint, the wiring grommet was gone, and it had quite a bit of rust inside. (After all, they're out in the nasty rain and stuff under the hood.)

I dissected it and tweaked a couple things for a bench tryout. It spun, but not too well, and no noise at all came from it. But, as I said, it spun so I was happy with my purchase. After I tried it out, I left it in pieces and put it in a box for safekeeping, basically forgetting about it. A year or two later when I bought my GMC I had a renewed interest in it. Let's make that baby work!
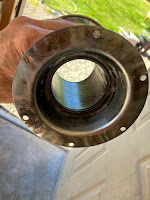
I tore it down and spent quite a bit of time straightening it and cleaning the paint off the chrome end of the horn with various chemicals until it shone again. To treat all the rust I used this stuff I got at Lowe's for about $15. Like most similar products, you just paint it on and it converts the dry, rusty area into a hard, shiny, black surface that's a perfect base. Here you can see what it looks like after I painted the stuff onto the rust inside the horn bell and let it dry.
When I tore it apart, almost all the screws holding it together twisted off when I tried to unscrew them, and the paper gaskets on either side of the drum head were almost totally disintegrated. Well, there are no Hutchins oogah horn paper gaskets anywhere on planet Earth that I know of, so obviously I had to make them. No problem--we have a Cricut here at our place, and it makes awesome gaskets!
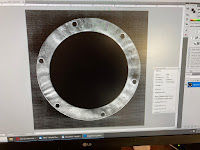
First, I placed the horn bell on the scanner and took a picture of it, then I cleaned up the resulting scanned image in Photoshop, making sure all the edges and holes were smooth. Note: If you don't smooth the edges, the poor Cricut will work itself to death trying to cut what it thinks are intricate cuts but are really just rough edges. No dimensions were changed during scanning or editing, so the screw pattern should be accurate.


I spent some time cleaning and prepping on the painted parts, then shot them with some good ol' Krylon dark blue like the original was. The brushes were in good shape (after all, a horn isn't a continuous-running thing), so I didn't have to do anything there. I bought stainless steel screws to replace the old rusty originals. I reassembled it as careful as I felt like being, carefully lining everything up before tightening the screw that holds cap on the motor. (The new gaskets fit flawlessly!)
Now that I finally had my fully-functional Hutchins Oogah horn, I had to figure out how to mount it. The OEM setup was a simple, almost flimsy L-bracket that utilized two of the screws. I wanted something that didn't allow the horn to vibrate all the time like the originals do. You probably know the bracket I'm talking about. It's in the parts list at the bottom of the post if you don't. I opted to build a 'two-level' mount, with part of the mount carrying the weight of the motor, and the other end providing support for the bell end to keep it from vibrating. I used a couple of sections of 3" exhaust pipe I had laying around, adjusting the radius to match the horn dimensions. I tied them together with a piece of 1/8" x 1" steel strap material. I opted to mount it on driver's side, next to the radiator. It seems like a good, out-of-danger place to put it--I may be wrong. Time will tell.
After mounting it all up, it all fits perfectly, but I'm not totally pleased with the hose clamp look as I thought I would be.
When it came time to tune it, I was at a loss. I couldn't see a way to tune it without building a special little tool to make it happen. (I'm sure they had something similar in the factory.) Basically, all I did was cut a 6" length of tubing from some scrap I had laying around, then welded an old 7/16" 1/4" drive socket to one end, and spot-welded a 1/4-20 nut on the other end. The length I chose was long enough to reach the depth of the horn adjustment nut. This 3/16" blade Crapsman screwdriver (part# 41248 K WF) is just the right size and length to reach all the way through the tool. Now it's just a simple act of adjust/tighten/lock/test/loosen/adjust/lock/test until you get the good oogah tone.
For those of you looking for a tech info about the Hutchins Oogah horn, here's a parts list:


